1.07 Crab Ravioli w/ Creamy Tomato Vodka Sauce – Advanced
– Rice & Pasta
This was the starter I devised for my very first dinner
party. Back then I did everything by hand and ended up feeling exhausted by the
time it came to eat it. Now I’ve revised it so that every part of the recipe
begins in a food processor, and you’ll thank me for that as it cuts down on a lot of
the work.
If you are not making your own pasta, then this is
probably an Intermediate grade recipe.
PART A – FRESH PASTA
Ingredients:
175g Grade 00 white flour (plus some extra for kneading
and dusting)
1 tbsp extra virgin olive oil
3 large eggs, at room temperature
Pinch of salt
These ingredients should be enough to make a starter for
at least 4 people, otherwise you could probably get a generous main for 2
people out of it.
You would not find extra virgin olive oil in most
traditional fresh pasta recipes, but I find that it alters the texture and
makes it hold a shape better. Plus, you get a bit of extra flavour, and that’s
never a bad thing!
You will need a pasta roller as well as a food processor
for this recipe.
Method:
1. In a food processor, blend the flour, olive oil, 2 of the eggs and a pinch of salt until
combined.
2. Add in the extra egg, and maybe a splash of lukewarm water if necessary, then
blend again. (TIP: It’s always better to be too wet than too dry as the dough
will absorb more flour while you are kneading it.)
3. Dust a clean bench with some of the additional flour,
then remove the pasta dough from the food processor and knead it until it forms into a ball and all
ingredients are fully incorporated. (This shouldn’t take very long as the food
processor will have done most of the work.
4. Wrap with cling film and place into the fridge for
20-30 minutes. (This allows the glutens in the flour to relax and makes it
easier to roll out.)
5. Remove the chilled dough from the fridge, and cut into quarters.
6. Roll or shape one quarter of the dough into a rough rectangular shape.
7. Starting on the widest setting, roll the dough through
the pasta machine. Fold over twice, then pass through the machine again, and then
fold and roll it through for a third time. (Have some extra flour on hand in case it starts to
stick.)
8. Repeat Step 7 for each setting of the pasta machine
until you are left with long, thin sheets of pasta. (As it gets thinner you’ll
need to fold it more than 3 times. It may become a 2 person job by the end!)
9. Dust both sides with flour, semolina or polenta and cover
with a damp kitchen towel, then place aside until needed. (Try not to take too
long as it could absorb some water from the damp towel and become sticky
again.)
10. Repeat Steps 6-9 with the remaining quarters of the pasta
dough.
11. The pasta is now ready for filling. (Or whatever else
you want to use it for.)
PART B – CRAB RAVIOLI
Ingredients:
250g cooked white crab meat
200g ricotta cheese
1 egg yolk
1 egg white
1 garlic clove, minced
1 tbsp fresh dill, roughly chopped (optional)
1 tbsp cold water
Salt and pepper
I suppose since this is ‘Advanced’ you can feel free to
pick the crab meat yourself (or make the ricotta, it’s not as difficult as you’d
think), but really, I wouldn’t bother. Most fishmongers or even supermarkets will
sell pre-picked crab meat separated into white or brown. If you can’t get only
white meat, then get some brown too. Just try not to use tinned crab meat
unless you have no other choice.
Dill and I have a somewhat tumultuous relationship. Most
of the time I hate it with a passion, while at other times I don’t mind it at
all. Sometimes I’ll use dill in this recipe, sometimes I won’t. It’s all a
matter of Food vs Mood.
In order to be efficient, I usually start this part of
the recipe while the pasta dough from Part A is still chilling in the fridge.
That way the timing should match up when you need it to.
Alternatively, it seems to be all the rage lately to use wonton wrappers to make ravioli instead of pasta. I don't consider it to be the same thing at all, but if you want to do it, I can't stop you!
Method:
1. Place the crab meat, ricotta, garlic, dill, egg yolk,
and a pinch of salt and pepper into a food processor and blend until combined.
(If you want to leave the crab chunky, just mix these ingredients in a bowl instead.)
2. Cover with cling film and place into the fridge for
20-30 minutes to chill.
3. Once chilled, place spoonfuls (up to 1 tbsp) of the
filling onto your rolled pasta sheets, leaving intervals of approx. 5 cm (or 2
inches).
4. Whisk the egg white with the water until combined.
5. Brush the pasta around each spoonful of filling with
the eggwhite mixture.
6. Cut the second pasta sheet into squares and place a
square over the top of each spoon of filling, and press down to seal. (TIP: Press out as much air as possible
as otherwise it will expand while cooking and may burst the pasta.)
7. Cut the pasta into round parcels as symmetrically as
possible. (I use a round cookie-cutter or something similar.)
8. Dust pasta parcels with some flour, semolina or polenta
to prevent sticking and place aside until needed. (They seem to freeze fairly
well, just add a bit of extra time to cooking.)
9. To cook the ravioli, place them gently into a pot of bubbling
salted water and cook for 3-5 minutes. (If the water is boiling too rapidly, it
could break the pasta. To salt the water, just add approx. 1 tbsp of salt per 1
litre of water. TIP: You should not
cook the ravioli until the sauce is cooked and you are ready to assemble the
dish.)
PART C – CREAMY TOMATO VODKA SAUCE
Ingredients:
1 large red onion
2 cloves garlic, peeled
6 large roma tomatoes
50g unsalted butter
90ml vodka
300ml double or thickened cream
Olive oil (for frying)
Salt
This sauce is actually fairly low-maintenance thanks to
the food processor.
You can use Spanish red onion or Tuscan red onion, they
are both fairly similar in flavour, just make sure it’s large.
As the olive oil is just for frying the onions, you do
not need to use Extra Virgin. If you still choose to do so, there’s nothing
wrong with that.
Although this is a cream sauce, it doesn’t seem to split
when reheated. I’m not a scientist, but I think it has something to do with the
starch in the vodka. This means that you can make it in advance and reheat it when
you need it. If you do this, I would recommend that you do it slowly over a
gentle heat just in case.
Method:
1. In a food processor, blend the onion and garlic. (You
can puree it or leave it with a bit of texture, but it doesn’t matter as it
will be sieved out of the sauce at the end.)
2. In a large pan over a high heat, fry the onion
and garlic with some olive oil and a large pinch of salt until all
liquid has evaporated and it begins to brown.
3. While the onions are frying, place the tomatoes into
the food processor and blend to a puree. (In order to catch any leftover onion
or garlic, you do not need to rinse the processor first.)
4. Add the tomato to the pan and fry until the liquid has
evaporated.
5. Add the vodka and allow to simmer for at least 30
seconds. (You probably can’t flambé it as the tomatoes will still retain some
moisture which will dilute the alcohol.)
6. Add the butter and stir until melted through.
7. Stir in the cream, reduce heat, and simmer for 5
minutes.
8. Pour the sauce into a small pot through a sieve and
return to the heat. (You can either discard the strained onion, garlic and
tomato, or store it to have with some grilled ciabatta later. Nobody’s judging
you here!)
9. Allow the strained sauce to simmer for another 5-10
minutes or until thickened. (TIP: This
is an ideal time to cook the pasta. You should also try a spoonful of the sauce
to see if any further seasoning is required.)
10. The sauce should now be ready to serve with the
pasta. (Don’t be surprised that by the end you are only left with approx. 250ml
of sauce, it is very concentrated and a little bit goes a long way!)
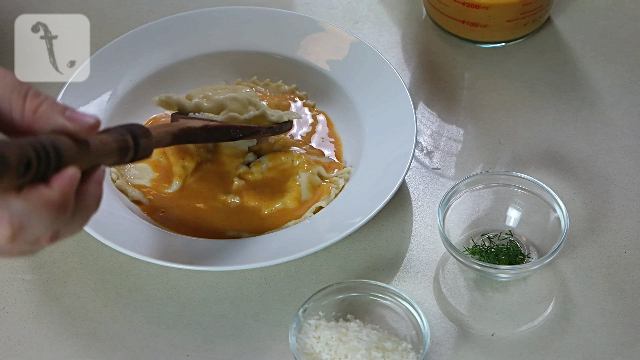
PART D – ASSEMBLING THE DISH
Ingredients:
Grated parmesan cheese (optional)
Finely chopped dill (optional)
As a starter, 4-5 ravioli should be sufficient for each
person.
Some purists will be shocked to see a
seafood pasta served with parmesan, but the filling already has ricotta in it,
so who really cares? For me, a pasta isn’t quite right unless there’s parmesan
on top.
Method:
1. Place a large spoonful of sauce in the bottom of each
plate/bowl.
2. Place 3-4 ravioli onto the plate in a circle. (Albeit a squarish or
triangular “circle”.)
3. Spoon more sauce over the ravioli. (As much or as
little as you think is appropriate.)
4. Place one more ravioli on top.
5. Spoon some more sauce over the top.
6. Sprinkle over the parmesan and/or dill, or leave in
bowls for your guests to use as desired.
7. Enjoy thoroughly.
Makes 4-5 starters or 2 mains.