28 December 2015

SEASON 3 VIDEO BONUS RECIPES


As with last season, there were a few BONUS recipes which appeared only on the FoodPoint Youtube channel as companions to the Season 3 'Tips' episodes. If you missed these recipes and would like to check them out, please click the links below.

Spaghetti alla Puttanesca - Low-Fuss - from 'Tips #4: Using Packaged Products'


The video recipe is available at https://youtu.be/m8vk_1e_p3s.

Steak & Stout Pie - Intermediate - from 'Tips #5: Food & Alcohol'


The video recipe is available at https://youtu.be/ZY-EqgSpAOc.

Simple Canapés - Low-Fuss - from 'Tips #6: Building a Menu'


The video recipe is available at https://youtu.be/dt2I-2rEhLE.

Enjoy!
--- Blake

22 December 2015

Season 3 BONUS Recipe: Christmas Pudding Profiteroles – Advanced – Baking & Desserts


Season’s eatings!

As mentioned waaaayyyy back in Episode 1.01, I’ve always loved profiteroles, so the excuse to create a new flavour for the Season 3 BONUS was too good to ignore, and thanks to my friend (CakesByChoppa) I had some custom decorations to up the “wow” factor.

Oddly enough, I really don’t like Christmas Pudding very much (or fruit cake, or hot-cross buns, or raisin toast, or basically ANYTHING with currants or raisins in it) so this is my way to get some of the flavour without reaching for the dried fruits.

PART B – CHOCOLATE CHOUX PASTRY


Ingredients:
1 cup warm water
100g butter
⅔ cup Grade 00 white flour
2 tbsp cocoa powder
2 tbsp icing sugar
4 large eggs from the fridge

Essentially the same recipe as for my plan Choux Pastry, but with some of the flour removed to make space for the cocoa and sugar.

Even with the sugar this isn’t exactly a sweet pastry, but it helps to take the bitter edge off the cocoa.

Method:

1. Preheat oven to 200°C (approx. 390°F) and line some trays with baking paper.

2. In a medium-sized pot, heat the water and butter until simmering, then turn down to a medium-low heat and leave for a minute or two. (Please make sure you don’t use a small pot as you may have a difficult time when it comes to adding the flour and mixing.)

3. Sift together the flour, cocoa and sugar and add to the pot, mixing thoroughly with a wooden spoon until it is all incorporated and the batter forms a ball that does not stick to the edges of the pot.


4. Remove from the heat and transfer to a bowl.

5. Whisk the eggs together in a jug to break up the yolks then beat the eggs into the batter a bit at a time until fully incorporated. (As previously, I add approx. ¼ of the egg at a time. Per the comments on the original Choux Pastry, as soon as you add the eggs and start mixing, the batter will immediately split. KEEP MIXING! Eventually it will come back together again.)

6. Transfer the batter into a piping bag and pipe mixture into balls on the prepared trays, ensuring to leave enough space between for them to inflate as they bake.


8. Bake for 25-35 mins or until puffed and make a hollow sound when tapped. (If you have piped them smaller, this may only take 20 mins or less, whereas if you piped them bigger, this could take 40 mins or more.)

9. Turn the oven off, but leave the profiteroles inside for another 15-20 minutes with the door slightly ajar.

10. Remove from the oven, allow to cool, then they’re ready to be filled!

A video of this part of the recipe is also available - https://youtu.be/BVZq69Nr-Fs.


PART B – SPICED ORANGE CRÈME PÂTISSIÈRE


Ingredients:
3 cups milk
1 tsp vanilla paste/extract/essence
6 large egg yolks at room temperature
½ cup brown sugar
½ cup cornflour/cornstarch
½ tbsp mixed spice
Zest of 1 orange

Once again, just a slight twist on the original Crème Pâtissière from Episode 1.01.

I have swapped the caster sugar for brown sugar, which is unusual for custards, etc. but it gives a more malty flavour which just enhances the Christmas feel of the profiteroles.

Mixed spice is a blend of cinnamon, nutmeg, allspice, cloves and even coriander in any number of quantities and variations. If you can’t get mixed spice, ideally you’ll just want cinnamon, nutmeg and cloves, which seem to me to be the most Christmas-like spices.

Method:

1. Add milk, zest, vanilla and spice into a largish pot and bring to a simmer over medium heat. (NOTE: You will need a pot big enough to mix all of the ingredients in later.)


2. While the milk is heating, whisk the egg yolks and sugar in a large jug until combined, then add the cornflour and continue to whisk until pale and thick. (Once again, the jug/bowl needs to be large enough to mix all of the ingredients in.)

3. Once the milk has just started to bubble, remove the pot from the heat and pour carefully into the egg mixture while whisking constantly.

4. Continue to whisk together for a further 5-10 seconds to ensure it is combined, then pour the custard mixture back into the pot and return to the heat.


5. Whisking over a medium-low heat until the desired consistency is reached, then remove from the heat and pour into a bowl to cool. (TIP: Place a sheet of cling film directly onto the surface of the crème pâtissière, this will stop it from forming a skin.)

6. Once cooled, place it into the fridge to chill, and then it is ready to be used as a filling!


PART C – WHITE CHOCOLATE GLAZE


Ingredients:
200g white chocolate
¼ cup icing sugar
2 tbsp glucose syrup
1 tbsp milk
1 tbsp water

This is just a fairly basic glaze, but it seems to complete these profiteroles in the best possible way.

Even if you’re not a fan of white chocolate, I suggest that you make this anyway. (It’s THAT crucial to the recipe!)

Besides, it’s really simple.

Method:

1. Place all ingredients into a saucepan over medium-low heat.

2. Stir together gently until all the ingredients are melted together and smooth. (White chocolate just LOVES to separate, but if you mix enough it should turn out okay.)


3. Remove from the heat and place aside to cool. (DO NOT CHILL. It may firm up completely, which means you won’t be able to pipe it onto your profiteroles.

PART D – ASSEMBLING THE PROFITEROLES


For those who don’t already know.

Method:

1. Using a chopstick (or a skewer, or something similar) pierce the pastry shell to allow the piping nozzle inside. (I fill from the top of the pastry case and seal by dipping into chocolate or toffee – or in this case, glaze.)

2. Transfer the chilled crème pâtissière into a piping bag with a small nozzle. (You may need to give it a quick mix first to ensure it is smooth.)

3. Pipe the filling into the holes you made with the chopstick/skewer.


4. Transfer the white chocolate glaze into another piping back and pipe a generous amount onto each profiterole, covering the hole you made.

5. You can serve these like this, but if you’re able to get some sort of edible Christmas decoration to put on top, DO IT! If you’re interested in making your own, please check out the CakesByChoppa channel for some tips.


Makes anywhere from 10-35, depending on how big you’ve piped them.

A video for Parts B, C & D of the recipe is also available - https://youtu.be/2_UlEsr0tVg.

***Well, that's it for Season 3. I wish you all a HAPPY HOLIDAYS! and I will be back on 29th January 2016 with my new season where YOU DECIDE what I cook! Please keep an eye out for any updates during this time. You can also message or email me if you have a dish you'd like me to make!***

18 December 2015

3.12 Chicken & Pumpkin Risotto – Low-Fuss – Rice & Pasta


Just for a change of pace, I thought I’d end this season on a savoury note. But don’t despair, I’ll be putting up a sweet bonus recipe very soon!

This is not a proper risotto like the one from a few weeks ago, this is the easy way, but it still delivers all the flavour and comfort for only a fraction of the effort.

To my Italian relatives, I apologise for messing with traditional recipes again. But don’t knock it until you’ve tried it!

Ingredients:
350g chicken breast, diced
200g pumpkin, peeled and diced
2 cups jasmine rice
1.2 L chicken stock
1 large brown onion, diced
2 large garlic cloves, minced
150mL dry white wine
50g baby spinach leaves
1 tbsp mixed Italian herbs
¼ cup grated parmesan
1 large egg, at room temperature
2 tbsp cream
Zest of ½ lemon
Salt & pepper
Olive oil (for frying)

This may be more ingredients than a standard Low-Fuss recipe, but most of it you can buy already prepped. Almost every supermarket sells pre-diced chicken breast and, as usual, for the pumpkin I use butternut squash which has already been peeled and diced.

You aren’t hallucinating, I did say jasmine rice in a risotto. Normal risotto rices take too long to cook, with all the stirring and whatnot, plus I like the extra hint of flavour that jasmine rice brings. You can use regular long white rice instead if you prefer. I’m not sure how basmati rice would work here, but feel free to test it if you want.

‘Mixed Italian herbs’ is usually a combination of dried sage, rosemary, marjoram and/or thyme. If you want to use a specific one of these herbs, they should all go well with both chicken and pumpkin. Fresh herbs are always good, but dried herbs require no preparation.

Method:

1. Fry the onion and garlic in some oil with a pinch of salt over a medium-high heat until browned.

2. Add the diced chicken and fry until browned.

3. Add the pumpkin and fry for 1-2 minutes.


4. Add the white wine and herbs and allow to simmer for at least 30 seconds.

5. Stir in the rice.

6. Add 1/3 of the stock and stir until bubbling.


7. Reduce the heat to low, cover, and leave to simmer for 7 minutes.

8. Stir in half of the remaining stock, cover, and leave to simmer for another 7 minutes.

9. Stir in the remaining stock, cover, and leave to simmer for a final 7 minutes.

10. Stir in the spinach leaves and check the texture of the rice. (It should be basically cooked, and hopefully it has not dried out too much. If not, add an additional 150-200ml boiling water and allow to simmer for another 5 minutes or so until the desired consistency is reached.)


11. In a small bowl or jug, whisk together the egg, cream, parmesan, lemon zest and a pinch of salt and pepper until combined.

12. Stir the egg mixture through the risotto until combined.


13. Serve immediately. (TIP: Sprinkle some toasted pine nuts and shaved parmesan cheese on top to give it a boost. I have been known to use crumbled feta instead of shaved parmesan if I have some hanging around in the fridge.)

Makes enough to serve 3-5 people.

A video of this recipe is also available - https://youtu.be/z6dBQdYapVM.

13 December 2015

3.11 Tips #6 - Building A Menu


I hope you’re enjoying the recipes so far, but it’s time for the last of this season’s Tips.

If you're considering hosting your first dinner party and need a little advice, ofr if you're just looking for a few recipes for your next dinner party, then this video should provide some help for both instances. Plus, there’s a BONUS recipe for some simple but delicious Canapés!

If you feel that you can sit this one out, I will be back with another recipe next week. For everyone else, please watch the video at https://youtu.be/jcF6F21tCDA.

If anyone would like to share their own tips, or even if you just have a question, please do not hesitate to email me.

4 December 2015

3.10 – Crêpes au Citron – Intermediate – Baking & Desserts


Roughly translated, this rather stylish-sounding dish is simply ‘lemon pancakes’. For those of you familiar with Crepes Suzette, this is an enjoyably tangy alternative for those of us who prefer lemons to oranges.

Plus there’s some flames involved again! Whilst some of you may be starting to think I’m some sort of pyromaniac, since when is a little excitement and theatre in food a bad thing?

PART A – BASIC SWEET CREPES


The title says it all. You can use these for any dish that requires sweet crepes, or just eat them in place of the more standard pancakes which can sometimes be a bit too stodgy.

Ingredients:
1 ½ cups plain flour
1 cup milk
1 cup water
2 eggs
2 tbsp caster sugar
50g unsalted butter
Pinch of salt

I find that a combination of milk and water does a better job than either do on their own. I would recommend using full cream milk as I’m not sure whether skim or semi-skim milk would work the same. Either way, you won’t find either of these in my fridge unless I’m deludedly trying to be “healthy” again.

Method:

1. Melt the butter, then place aside to cool slightly. (Use whatever method you like, most often I’ll just do it in a cup in the microwave because it’s less to clean than a saucepan on the stove. The important thing is that it’s FULLY melted when you do it, not just softened.)

2. Place the milk, water and eggs into a jug or bowl and whisk until combined.

3. Sift in the flour, caster sugar and salt, and mix gently until smooth. (Beating too quickly can activate the gluten in the flour and results in rubbery crepes.)


4. Gently whisk in the melted butter until combined.

5. Cover and place aside to rest for at least 1 hour. (I’ve left mine out overnight in cooler weather and had no issues. TIP: You should give the batter another gentle whisk before using it to ensure everything is still combined and smooth.)

6. Heat your crepe pan over a medium-high heat. (If you don’t have a crepe pan, just use a normal frying pan approx. 20cm (8 in) in diameter.)

7. Pour/ladle some of the batter into the pan, then swirl the pan immediately to spread out the batter into a thin layer. (This is a good way to gauge how much of the batter you’ll need for each crepe. As with pancakes, often the first crepe isn’t usually the best.)


8. Fry the crepe for 30-60 seconds on each side or until light-brown at the edges, then remove and place between a layer of kitchen towel.

9. Repeat Steps 7 & 8 until all the batter is used.

10. You can serve the warm crepes with some strawberries and cream, or with some sugar and lemon juice, or however you want to eat them (Peking Duck Pancakes anyone?). If you’re going to make the full recipe, then place the crepes aside while you make the lemon syrup.

Makes 6-12 depending on the size of your pan and adeptness in spreading the batter.

PART B – LEMON SYRUP


The title is a bit misleading here, as this is technically a lemon and lime syrup, but sometimes I can’t be bothered being pedantric. Call it whatever you want to.

Ingredients:
2 lemons
1 lime
⅔ cup caster sugar
½ cup water
50g unsalted butter
Limoncello (optional)

As with some previous recipes, when I say the Limoncello is “optional”, I mean you darn well better be using it! I have not specified an amount because it’s sort of up to you to decide how much is enough.

Method:

1. Zest and juice the lemons and lime. (I prefer to use an actual citrus zester for this as opposed to a microplane as the larger strips look more appealing, but you can use whatever implement that feels most comfortable to you.)

2. Place the citrus zest and juice into a pan along with the caster sugar and water and stir together off the heat until the sugar is mostly dissolved.


3. Place the pan over a medium heat until it begins to simmer, then add some Limoncello if you’re using it. (I’d say anywhere between ¼-½ cup, as I’ll be adding more later.)

4. Reduce the heat and allow to simmer until slightly reduced and syrupy, then add the butter and stir until melted.

5. Fold the crepes in half, then in half again and place them into the syrup around the edges of the pan. Spoon some of the syrup over the top of the crepes to ensure they are soaked. (Only place in as many crepes as will fit without overcrowding the pan. Some slight overlapping is fine, but you really want only a single layer if possible.)


6. Allow the crepes to simmer in the sauce for 1-2 minutes before removing from the heat.

7. You can serve these now, OR… if this is the conclusion of a dinner party (or you’re just a quirky person):

8. Place some more Limoncello into a small saucepan and bring it to a simmer. (Once again, maybe around half a cup or so.)

9. Dim the lights, set fire to the Limoncello, and pour it over the pan of crepes. Shake the flaming pan gently until the flames subside, then serve with some ice cream, whipped cream, or mascarpone.


Serves 3-6 depending on how many crepes you managed to fit into the pan. I usually allow 2 crepes per person.

A video of this recipe is also available - https://youtu.be/G6onyWjPZW4.

29 November 2015

3.09 Seared Scallops w/ Saffron Risotto & Salsa – Advanced – Rice & Pasta


Every so often I get into a “cheffy” mood, and end up with recipes like this. I’m not really a seafood person, but occasionally I make exceptions.

This dish can either be a starter for 4 people, or a main for 2 people.

PART A – TOMATO SALSA


Ingredients:
250g baby Roma tomatoes, deseeded and diced finely
2 tbsp extra virgin olive oil
Pinch of salt

It might seem odd to start with the quickest and easiest element. I have presented this recipe in order of how each component should be made. The salsa needs time to sit and allow the flavours to mingle. The risotto takes approx. 30 minutes from beginning to end. The scallops take around 5 minutes altogether.

This is a very basic salsa which is just there to add some colour and acidity. I use baby Roma tomatoes mainly because it’s easier to cut something into small pieces if it’s already small to start with, but they also can sometimes have a bit more flavour than regular Roma tomatoes. You can also use cherry or grape tomatoes.

Method:

1. Mix all ingredients in a bowl.


2. Cover, and set aside until needed. (How’s that for Advanced?!)

PART A – SAFFRON RISOTTO


Ingredients:
1 leek, cleaned, trimmed and sliced into crescents
2 cloves garlic, chopped finely
1 ½ cups Arborio rice
800ml vegetable stock, warm
100ml dry sherry
½ tsp saffron threads (or a good pinch)
¼ cup grated parmesan
1 large egg yolk, at room temperature
2 tbsp cream
Zest of ½ lemon
30g butter
Salt and pepper

Unlike most of my recipes, this is fairly traditional. It is fairly adaptable, just change the type of stock and experiment with different herbs and spices. Be warned, there is quite a lot of stirring involved!

Leeks have a milder flavour than onions, and they take less time to soften. If you want to swap the leeks for onions, there should be no real issue.

I use Arborio rice as it’s more readily available, but you can use any type of risotto rice you like (i.e. Carnaroli, etc.).

The stock can be fresh, powder, tablet, concentrate, out of a carton, it doesn’t matter to me. It just needs to be warm so it doesn’t change the temperature too much when you add it to the rice.

Sherry provides a deeper flavour than wine, but if you prefer to use white wine instead, go for it.

If you cannot find saffron threads… well I’m not really sure why you’d make this recipe. I’ve never used imitation saffron, but as far as I know it’s just a colour and not a flavour.

Method:

1. Add the saffron threads to the sherry and stir together, then place aside until needed. (This allows the colour to begin to seep out.)


2. In a pan over medium-high heat, melt the butter and fry the leek and garlic with a pinch of salt until soft.

3. Add the rice to the pan and stir until it is coated in the butter.


4. Add the sherry and saffron threads and stir until mostly evaporated. (The colour does not change right away, but gradually changes as you continue with the recipe.)

5. Turn the pan down to medium-low and add a splash or ladle full of stock.

6. Stir the pot gently until the liquid has has almost all evaporated, then add another splash/ladle full of stock. (This will take 3-5 minutes.)

7. Repeat Step 6 until the last of the stock is gone. (Should take approx. 20-25 minutes for this to happen.)


8. Test a piece of rice to check whether it is cooked to your desired consistency. If necessary, add ½ cup of boiling water and stir until almost evaporated. (As with pasta, the grains of rice in a traditional risotto are meant to be al dente, which basically means they should still have a bit of bite – as a matter of face the translation of al dente is “to the tooth”. If you want your rice completely soft, then you’ll need to add more liquid and cook it for longer.)

9. In a small bowl or jug, whisk together the egg yolk, cream, parmesan, lemon zest and a pinch of pepper. (You can also add a pinch of salt if you like, but the stock has probably added enough salt already.)


10. Stir the egg mixture through the risotto until combined, then remove it from the heat, cover, and place it aside until assembling. (I wouldn’t recommend leaving it for more than 5 minutes.)

PART C – SEARED SPICED SCALLOPS


Ingredients:
12 large scallops, roe removed
50g unsalted butter
2 tbsp extra virgin olive oil
Sumac
Cayenne Pepper
Salt

You can leave the roe on the scallops if you must, but it sort of grosses me out for some reason. Plus it wouldn’t look right with the way I serve it.

Sumac, for those that are still unfamiliar with it, is a middle-eastern spice that adds a hint of citrus tang. It goes really well with seafood and chicken.

I like the spice of cayenne with seafood also, but it can be very potent, so use as little or as much as you like. You can replace it with regular white or black pepper if you’re a bit unsure.

Method:

1. Rinse the scallops and pat dry on some kitchen towel.

2. Sprinkle some sumac, cayenne pepper and salt over the scallops. (However much or little is completely up to you. You don’t have to add any if you don’t want to.)


3. Heat the butter and oil in a pan over medium-high heat until bubbling.

4. Place the scallops into the bubbling butter/oil and fry for 30-45 seconds on each side, occasionally spooning some of the butter/oil over the top of each scallop.


5. Remove the scallops from the pan, and slice in half through the side. (You should now have 24 thin discs of scallop.)

6. Assemble the dish right away.

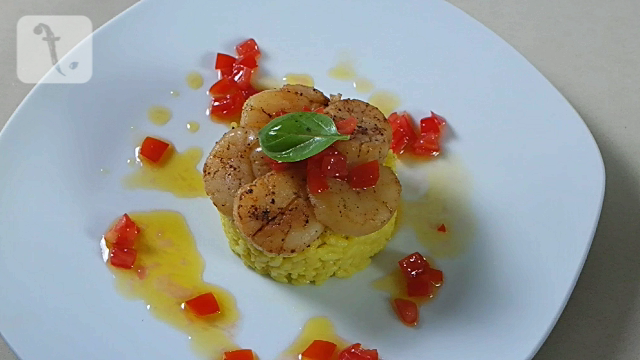
PART D - ASSEMBLING THE DISH


Ingredients:
Baby basil leaves (optional)

When I say that the basil is optional, I kind of really mean it's totally necessary! Although it doesn't really add anything more that a bit of flavour and aesthetic appeal.

I suppose I’m being a bit fussy with this, but that’s what Advanced recipes are all about, right?

You could just throw it all on a plate, but if you’re already come this far…

Method:

1. Using a couple of stacked egg rings (or something similar), place a circle of risotto in the middle of each plate. (Not too little, not too much.)


2. Leave the rings in place and arrange 5-6 of the seared scallop halves on top of the risotto in a circle, overlapping slightly.


3. Remove the egg ring gently, so the risotto and scallops stay in place.

4. Drizzle some salsa around the outside of the risotto, and then a small amount on top of the scallops.


5. Place a basil leaf on top of the salsa in the centre of the scallops.

6. Serve immediately.

As I said, serves 2-4 people depending on whether it is a starter or a main.

A two-part video of this recipe is available - https://youtu.be/Cpnl6j0aqKM & https://youtu.be/kdZCnZ61ZTI.

22 November 2015

Tips #5 - Food & Alcohol


I hope you’re enjoying the recipes so far, but it’s time for another Tips video.

There can be some confusion when it comes to using alcohol as an ingredient, or even just pairing an alcohol to your food. I'll give you a rough guide on beers and wines, what goes with what, as well as some general information that may come in handy. Plus there’s a BONUS Steak & Stout Pie recipe!

If you feel that you can sit this one out, I will be back with another recipe next week. For everyone else, please watch the video at https://youtu.be/d3AXVmNzd48.

If anyone would like to share their own tips, or even if you just have a question, please do not hesitate to email me.

13 November 2015

3.07 Deep-Fried Chai Ice-Cream w/ Spiced Lychee Syrup – Advanced – Baking & Desserts


Ahem. Yes, this is quite a mouthful, isn’t it? In more ways than one!

This recipe is the direct result of me setting out to challenge myself. That’s right, I threw down the gauntlet, picked it up again, then went into the kitchen to use it as an oven mitt.

Admittedly needlessly complicated for a dessert, but if it turns out properly, the immense sense of relief and accomplishment is a high all on its own.

PART A – SPICED LYCHEE SYRUP


A lot of people don’t like lychees as they can sometimes taste like they’ve been soaked in perfume. If you would like to make your own syrup using a different fruit, or just buy something ready-made, that’s completely up to you. As this dessert was part of an Asian-inspired dinner party menu, I went with lychees.

Ingredients:
2x 400g tins of lychees in syrup
1 cup boiling water
1 cup caster sugar
1 cinnamon stick
2 star anise

Yeah, you caught me using tinned fruit already in syrup. Big deal. Fresh lychees just didn’t work properly, and believe me I tried!

Method:

1. Place all ingredients in a pot over medium-high heat and bring to the boil.


2. Reduce heat and allow to simmer for 1 ½ to 2 hours, or until deep amber and viscous. (Viscous means ‘syrupy’, but I think I’ve already said syrup too many times. And now I’ve gone and said it even more!)

3. Remove from the heat and allow to cool.

4. Pour the syrup through a sieve to remove the lychees and spices. (Keep these in a container if you want, they’re basically preserved. You just want that precious, precious syrup.)


5. Place the syrup into a jug, cover and refrigerate it until ready to assemble the dish.

PART B – DEEP-FRIED CHAI GREEN TEA ICE-CREAM


Ingredients:
For the Icecream:
200ml coconut cream
200ml sweetened condensed milk
250ml pure/single cream
2 tbsp loose green tea leaves
1 tbsp dried ginger
2 tsp black peppercorns
1 cinnamon stick
2 star anise
3 green cardamom pods
4 cloves

For the Batter:
1 cup white self-raising flour
1 cup chilled water
2 tbsp caster sugar
1 tsp cinnamon powder

I’m cheating again here aren’t I? Sure, I’m not making a custard base for the ice cream, but with the amount of fuss still to come, a bit of a shortcut is very handy here! The ice cream itself is a bit dense, but as you’re deep frying it, that should work to your advantage as it’s less likely to melt quickly.

Feel free to take out any of the above spices that you don’t like, just ensure that you replace them with something else so that you don’t end up with something that tastes too plain. If you can’t get dried ginger, then just use ground ginger instead as it’s the same thing, just powdered.

You’ll want to use a green tea with a strong flavour. I’ll recommend ‘gunpowder green’ as it’s pretty potent.

Method:

1. Place the green tea and spices into a mortar and pestle (or a spice grinder) and crush slightly. (You can grind it to a powder if you like, but I just want the release the flavours and strain the spices out later to keep the ice cream smooth.)


2. In a pot over medium-high heat, bring coconut cream to a simmer along with the green tea and spices.

3. Allow to simmer for 1-2 minutes, then remove from the heat and leave aside to cool. (Don’t worry about the tea going bitter, the overly-sweet condensed milk will even it out later.)

4. Pour the cooled coconut cream through a sieve to remove the spices, then mix in the condensed milk until combined.


5. Whip the cream to soft peaks, then fold into the coconut cream/condensed milk mixture a bit at a time until smooth.

6. Pour the mixture into a dozen 6cm hemispherical moulds. (I use a silicone mould as it’s easier to pop out the ice cream, but if you can only find a metal tray, simply place a sheet of cling film over it and pour onto that. You can probably get ice cube trays with the right shape too, or even a full sphere to make things easier.)

7. Pour any leftover mixture into a container and place it into the fridge for use in Step 9.

8. Place the filled moulds into the freezer and allow the ice cream to freeze solid.

9. Place a dollop of the unfrozen mixture onto the top of half of the hemispheres, then place the remaining hemispheres on top to make spheres.


10. Repeat Step 9 until you have at least 6 spheres.

11. Place back into the freezer and leave them until you are ready to coat them in batter. (The longer they freeze, the less likely they will melt while frying. You can make these up to a week beforehand to save time.)

12. In a bowl, mix together all of the batter ingredients until combined. (Try to remove as many lumps as you can, but don’t get too pedantic as lumps usually turn into crunch when they fry.)

13. Roll the spheres in the batter, and return them to the freezer for at least 2 hours.


14. Trim off any batter that may have puddled around the ice cream spheres, and then give a final coating of batter followed by more time in the freezer.

15. Once you are ready to serve, heat the oil in your deep fryer to 190°C (or 375°F).

16. Fry the frozen spheres for approx. 30 seconds or until golden brown. (Do this a few at a time, each sphere will reduce the oil temperature and you don’t want to overcrowd the fryer.


17. Serve immediately with some mixed diced fruits. (I’ll suggest dragonfruit, as they are still considered exotic by most people and can come in a range of bright colours. Otherwise, things like mango, kiwifruit and pomegranate are just fine.)

Serves at least 6, but you may have enough leftover ice-cream mixture and batter to make 8 or more serves.

A video of this recipe is also available - https://youtu.be/HzDQqgUhZpQ.