5.08 Sopapillas w/ Cajeta - Party Food - Intermediate
Up to the final entry of FoodPoint Fiesta already! And what better way to end it than with something sweet?
I discovered cajeta while I was researching foods for this season. It's a thick, rich caramel very similar to dulce de leche, with a couple of notable differences which I'll cover further down. The real challenge was finding some way to use cajeta that didn't deviate too much from the season identity.
I'd already cooked churros way back as a bonus in Season 1, so what other options did I have? A little more research turned up sopapillas, a lesser-known fried-dough treat that can be paired with dishes both savoury and sweet
Put them together and you get a surprisingly satisfying combination.
PART A - CAJETA
I've seen a lot of people around the internet refer to this as "Mexican caramel" or "Mexican dulce de leche". As mentioned above this is a fair assessment, however in order to explain the differences between cajeta and dulce de leche you first need to examine what it's made from.
Ingredients:
1L goat milk
3/4 cup caster sugar
1/2 tsp bicarbonate of soda
1/2 tsp salt
1 cinnamon stick
1 vanilla pod
Whereas dulce de leche would use cow's milk, cajeta uses goat's. Goat milk is more stable for the purposes of this recipe, plus it has a slightly tangy note that stops the caramel from being too cloyingly sweet.
The bicarbonate of soda is the real hero of this recipe. It causes a chemical reaction that lowers the boiling point of the milk, meaning that you're able to leave it simmering for a long time without it reaching the point where the milk would split.
In this recipe I tend to use pink salt, but you can really just use whatever type you prefer.
Cinnamon is also not something you would find in a typical dulce de leche, and it adds a pleasant, subtle warmth to the caramel. If you can't get a stick, just use a teaspoon or two of ground cinnamon.
You can also use vanilla paste/extract/essence instead of the pod if it's easier.
Method:
1. Get yourself a saucepan with a volume of at least 3 litres. (May seem like an odd start to a recipe, however the reason will become apparent later).
2. Split the vanilla pod and scrape out the seeds. Place this into the saucepan along with the cinnamon, sugar, and salt.
3. Measure out a couple of teaspoons of the milk and place aside for later in the recipe, then pour the rest into the saucepan and stir everything together to start to dissolve the sugar.
4. Place the pot over a medium heat until it just starts to simmer, then turn the heat off completely.
5. Add the reserved milk to the bicarbonate of soda and mix together, then pour this into the saucepan while stirring continuously. (WARNING: It will immediately start to fizz and expand, so go right to Step 6!)
6. Keep stirring the mixture to ensure it doesn't bubble over, it will take a few minutes for the bubbles to subside. (This is why you need such a large saucepan for such a small amount of mixture. I personally wouldn't exceed a saucepan with 4 litre volume as this could cause issues for the rest of the recipe, but anything smaller than 3 litres will probably result in a mess and a need to start again.)
7. Once the bubbling has subsided, turn the heat back on - this time to medium-low - and simmer the mixture for approximately 1 and a half hours, stirring every 10-15 minutes so it doesn't catch on the bottom of the pan. (As it simmers, you will see it getting darker and thicker.)
8. When the mixture reaches the consistency of pouring custard, remove the cinnamon stick and vanilla pod, then keep on stirring until thick.
9. Pour into a serving bowl and allow to cool for a few minutes before serving. (It will be incredibly hot right out of the pan. TIP: This stuff is awesome with just some plain vanilla ice cream!)
Yields approx. 250ml (1 cup) of cajeta. It may not seem like a lot, but a little bit goes a long way.
PART B - SOPAPILLAS
Wikipedia says "a sopaipilla, sopapilla, sopaipa, or cachanga is a kind of fried pastry and a type of quick bread served in several regions with Spanish heritage in the Americas".
Basically, it's a semi-sweet, doughnut-like pastry. If you don't douse them with icing sugar, cinnamon and honey (or cajeta) then they are savoury enough to be dunked into spicy meat dishes.
Ingredients:
2 1/2 cups plain white flour
1/2 cup milk, warm
1/3 cup water, warm
50g lard, cubed
1 tbsp baking powder
1 tbsp caster sugar
1/2 tsp salt
Oil (for deep frying)
Icing sugar and cinnamon (for dusting, optional)
Instead of goat's milk, this time you'll want ordinary cow's milk.
If you don't want to use lard (for some bizarre reason) feel free to use vegetable shortening instead.
Finally, I would use regular table salt for this recipe instead of pink salt.
Method:
1. Place all the dry ingredients into a bowl and mix together until dispersed.
2. Add the lard (or shortening) and rub into the dry ingredients until you're left with something that resembles bread crumbs.
3. Make a well in the centre of the flour mixture, then pour in the wet ingredients and mix until everything starts to come together into a dough.
4. Scatter some flour onto a bench and turn out the dough. Knead for 5-10 minutes or until smooth and springy. (You can use a benchtop mixer with a dough hook if you prefer, however it's not a particularly demanding job.)
5. Shape the dough into a disc, wrap with clingfilm and leave to rest for 20-30 minutes.
6. Once rested, dust with some more flour and cut the dough into quarters.
7. Roll each quarter out into an oblong shape approximately 1/2 centimetre thick, then slice each oblong into 6 fairly uniform square or rectangular shapes and place aside until needed.
8. Preheat your deep fryer oil to 190°C (370°F).
9. Take a piece of dough and place one edge into the oil. Once it starts bubbling, let it go. When the dough floats to the top, flip it over so that it rises evenly. Continue to fry while turning occasionally until golden brown, then remove from the fryer and drain on some paper towels. (It takes approx. 3-4 minutes for each sopapilla to cook.)
10. Repeat Step 9 in batches until all the dough is cooked.
11. Serve while still warm. If you're going the sweet route, dust with some cinnamon and icing sugar. Traditionally you can also drizzle them with some honey, but that's not necessary if you and serve with the cajeta.
Makes approx. 24.
A video of these recipes is available at https://youtu.be/ZXRdexIqNds.
5.07 Grilled Pineapple - Baking & Desserts - Low-Fuss
Onto the desserts!
I had a bit of difficulty choosing which desserts to include in this season as there are so many different varieties. In the end, after going to a Churrasco restaurant for my birthday dinner, I was inspired to go with this.
Warm and juicy and sweet an sour with just a hint of caramel, this dessert is incredibly satisfying (and not too naughty, either!).
Ingredients:
1 pineapple
1 lime
1/4 cup brown sugar
1 tbsp ground cinnamon
Only 4 ingredients, how could you go wrong?!
Method:
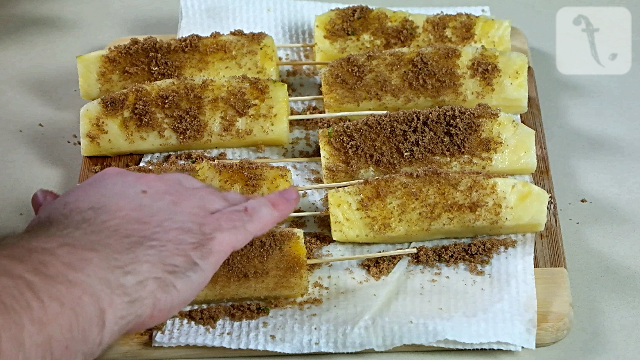
1. Trim the ends off the pineapple, then slice it in half down the middle lengthways. (Count: You'll now have 2 pieces of pineapple.)
2. Cut each half into halves again, then remove the core from each quarter. (Count: You'll now have 4 pieces of pineapple.)
3. Cut each quarter into 2 pieces, then use a small, sharp knife to remove the rind from each segment of fruit (kind of like filleting a fish). (Count: You'll now have 8 pieces of pineapple.)
4. Place the fruit onto some paper towel and pat dry.
5. Take some skewers and impale each segment down the middle, leaving enough of the skewer exposed for easy handling. Place aside until needed.
6. Zest the lime into a bowl, then add in the sugar and cinnamon and mix until well combined.
7. Scatter a generous amount of the spiced sugar onto each pineapple skewer, then gently rub in until evenly coated.
8. Place the pineapple skewers onto a hot grill pan (or a barbecue if you prefer) and grill for approx. 2 minutes on each side. (You're just trying to get caramelised bar-marks on the fruit, rather than actually cook it.)
9. Once marked on each side, remove from the pan.
10. Serve warm with wedges of lime for squeezing over. (TIP: Use the lime you zested earlier, obviously.)
Serves 8
A video of this recipe is available at https://youtu.be/719RLI21BpQ.
5.06 Slow-Cooked Beef & Beans - Meat & Poultry - Intermediate
This is the ultimate in versatility when it comes to Mexican food. You can use this meat in tacos, burritos, nachos, etc. or just eat it as is with some rice.
I know that most people probably can't be bothered waiting 4 hours for something (yep, 4 whole hours!) but I think it's totally worth it!
Other than the long waiting time, this recipe is fairly simple, so don't be deterred.
Ingredients:
2kg meat on the bone (i.e. osso bucco or short ribs)
1 1/2 cups dried kidney beans
500ml vegetable stock, hot
400g tin Mutti Polpa
1 red onion, diced
2 cloves garlic, diced
1 ancho chilli
2 pasilla chillies
2 dried jalapeno/chipotle chillies
2 tbsp brown sugar
1 tbsp ground coriander
1 tbsp ground cumin
1 tbsp cocoa powder
Salt
Oil (for frying)
Although I didn't specify in the ingredients, you're supposed to be using beef (it's the name of the dish, after all). As mentioned, you can use osso bucco (like I did), or short ribs, or even oxtail if that's your thing.
If you can get your hands on dried pinto or borlotti beans, use them instead. Kidney beans are just easier to get. I chose to use dried beans for 2 reasons: 1) they will hold together better after simmering for 4 hours, and 2) they will absorb some of the liquid and help the sauce thicken. If you want to risk using tinned or fresh beans, I'd recommend to add them in for the final hour of cooking.
The stock should be hot but not boiling. I used vegetable stock, but if you want to use beef or chicken stock go right ahead.
Yep, I just recommended Mutti Polpa again... I'm not a shill, I just love the product (as I've said before). If you can't find it, any tinned chopped tomatoes will probably work fine.
The ancho, pasilla and chipotle chillies are negotiable. If you prefer a different mix or to just use 1 type, that's on you. Keep in mind this will probably change the flavour of the dish slightly.
I suppose you wouldn't really expect to see brown sugar or cocoa in a savoury dish, but cocoa (and chocolate) tend to be used this way in Mexican cuisine to add richness of flavour. The sugar is to mellow the bitter edge that comes as a result.
Method:
1. Pour the hot stock over the chillies and place aside to soak until soft. (This will take around 10-15 minutes.)
2. In a bowl, mix together the ground coriander, cumin and approx. 1/2 tbsp of salt until combined. Scatter this onto a plate and coat your meat in it.
3. Heat a generous slosh of oil in a large pot over medium high heat and sear the meat for a couple of minutes on each side, then remove from the pan.
4. Leave the pan on the heat, add in the onion with a large pinch of salt and fry until softened.
5. Add in the garlic and fry until browned.
6. Place the soaked chillies and stock into a blender and blitz until smooth, then add this puree to the pot and stir until mixed.
7. Add in the tomatoes, then fill the tin with hot water and pour this into the pot. Stir until combined.
8. Add in the cocoa and sugar along with another pinch of salt and stir until combined.
9. Mix in the beans.
10. Return the meat to the pot, then bring to a simmer and turn the heat right down to low, place on the lid and allow to simmer for approx. 4 hours.
11. Remove the meat from the pot and allow to cool slightly before shredding the meat back into the pan.
12. Stir the beef into the beans and serve.
Serves 6-8.
A video pf this recipe is available at https://youtu.be/z1HkkftzSKQ.
5.05 Margarita Fajitas - Meat & Poultry - Low-Fuss
I'm not exactly sure how I came up with this dish, although I'm fairly certain that the name came first and everything just sort of fell into place around it. Either way, I make this a few times a year when I'm in the mood for something easy and tasty.
The "margarita" element refers to the cocktail and shouldn't be confused with the pizza (which is actually "margherita", anyway). Basically this dish has all the elements of a margarita carefully disguised with chicken, vegetables and spices.
Ingredients:
300g chicken breast fillet, sliced into strips
1 red onion, sliced
1 red capsicum, sliced
1 yellow capsicum, sliced
2 cloves garlic, minced
1/2 tbsp ground coriander
1/2 tbsp ground cumin seeds
30ml tequila
15ml triple sec
1/2 tsp caster sugar
Zest and juice of 1 lime
Olive oil
Salt
I guess you can use thigh fillet if you prefer, I just prefer breast (*wink*).
While I've specified a red and a yellow capsicum, this probably isn't necessary - I'm just channelling my inner Nigella again! Just use 2 of any combination of colours.
Okay, so the tequila, triple sec, sugar and lime (and to a degree, the salt) are the margarita elements. Basically, if you mix these elements together you'll end up with what is essentially the cocktail.
In relation to the olive oil, it doesn't need to be extra virgin. Just plain olive oil will do, or you can use a regular vegetable oil. You'll need approx. 1/4 cup of oil for this recipe.
Method:
1. In a bowl, mix together the chicken, garlic, cumin, coriander, sugar, lime zest, lime juice, a pinch of salt and approx. 1 tbsp of oil until everything is combined and evenly coated.
2. Heat another 1 tbsp of oil in a large frypan, then add the onion and a generous pinch of salt and fry until softened and it begins to brown. Place into a bowl and return the pan to the heat.
3. Add another tbsp of oil to the pan, then add in the capsicum and another pinch of salt. Fry until softened and the skin begins to blister, then place into the bowl with the onion and return the pan to the heat.
4. Add a final tbsp of oil to the pan, then fry the chicken until browned.
5. Return the onion and capsicum to the heat and mix together until all elements are relatively evenly dispersed.
6. Pour over the tequila and triple sec and stir until mostly evaporated. (This will take approx. 30 seconds)
7. Serve with wheat or corn tortillas and your favourite garnishes so people can assemble their own fajitas. (Usually I would just have some grated cheese, sour cream and salsa.)
Serves 4.
A video of this recipe is available at https://youtu.be/dNcA1B6HTQE.
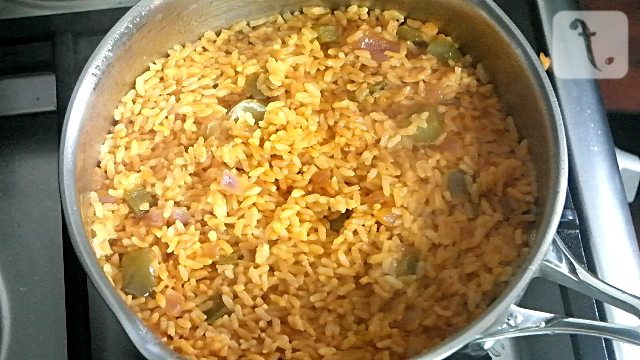
5.04 Arroz Rojo (Spanish Rice) - Rice & Pasta - Low-Fuss
The name of this dish literally translates to "red rice". It's also more commonly known as Spanish Rice or sometimes Mexican Rice.
You can eat it on its own, or top it with something tasty (such as chile con carne), or as a filling in burritos.
There's dozens of variants of this dish, and this is just my take.
Ingredients:
2 cups of medium-grain rice
500ml vegetable stock
300ml tomato juice
1 capsicum, diced
1 red onion, diced
2 cloves garlic, diced
1 tsp ground cumin
1 tsp ground coriander
1/2 tsp chilli powder
Salt
Olive oil (for frying)
I have specified medium-grain rice in an attempt to make this slightly traditional. If you can only get long-grain rice then you may need to add an additional 1 cup of water or stock as it will absorb more liquid.
If you'd prefer to use chicken stock instead of vegetable, then it shouldn't be an issue. I wouldn't recommend beef stock, however.
Recipes for this dish would usually include chopped tinned tomatoes, however I opted for juice instead as the flavour permeates more.
While I'm usually fairly disdainful of green capsicum, I really like the contrast with the red of the rice. Just use whichever colour you prefer.
Method:
1. In a saucepan, heat some oil over a medium-high heat.
2. Add the onion and a generous pinch of salt and fry until it begins to soften, then add in the garlic and fry for a further 30-60 seconds until it starts to brown.
3. Add the capsicum and fry until it just begins to soften, then add in the spices and fry for 30-60 seconds. (This is really just to toast the spices slightly and mellow the flavours.)
4. Pour in the tomato juice and stock and bring to a simmer.
5. Turn the heat down to low and add in the rice, stirring to ensure it doesn't clump at the bottom of the pan.
6. Cover the pan and leave to cook for 15-20 minutes or until all of the liquid is absorbed.
7. Give it a stir and serve hot!
A video of this recipe is available at https://youtu.be/uGkpQvG2fIw.
5.03 Mini Empanadas - Party Food - Intermediate
These tasty little treats are somewhere between a dumpling, a pie, and a savoury donut. If that sounds at all weird to you, please don't be dissuaded, because they're really good. (Flavourwise, anyway. Definitely not healthwise!)
Ingredients:
2 cups of plain white flour
150g unsalted butter, cubed
1/2 cup water, chilled
1 egg, chilled
2 tsp baking powder
1 tsp baking soda
Salt
Oil (for deep-frying)
Okay, so these ingredients are just to make the dough. I will include some filling options after the recipe but I'd like to stress the fact that you can fill these with practically anything. Experiment a bit!
Method:
1. Place the flour, baking powder, baking soda and a generous pinch of salt into a food processor and blend until well mixed.
2. Add the butter and blend to a consistency like fine breadcrumbs.
3. In a bowl, whisk together the egg and water until combined.
4. Add the egg and water mix to the food processor and blend until everything comes together into a dough.
5. Scatter some flour on your bench, turn out the dough and knead for around 5 minutes then wrap with clingfilm and place into the refrigerator for around 20-30 minutes to chill.
6. Preheat your deepfryer oil to 180°C (350°F).
7. Cut the chilled dough into 4 equal pieces and roll each quarter out to approximately 1/2 cm thick (approx. 1/5 inch).
8. Use a round pastry cutter roughly 10cm (or 4 inches) wide to cut out circles of dough.
9. Place approx. 2 tbsp of filling into the middle of each circle. (Once again, the filling is totally by preference.)
10. Brush the edges of the dough circles with some water and press together, then fold the edges over a bit at a time to seal the empanadas. (This is called "crimping" for those of you who are new to this.)
11. Fry the empanadas in batches for 3-4 minutes on each side or until golden brown, then drain on some paper towel before serving.
Makes 20-30.
A video of this recipe is available at https://youtu.be/soPUIKMs7do.
OPTIONAL EXTRAS - EMPANADA FILLINGS
Okay, so I'll share 3 different fillings, none of which are too overly complicated.
Also, I will provide an alternative use for each filling in case you decide you like it and want to use it in other ways.
Filling #1: Potato, Chorizo & Cheese
Basically all in the name.
Alternate Use: Add some to a couple of eggs whisked with some sour cream for a simple and tasty frittata (basically an omelette).
Ingredients:
1 cup potato, boiled and diced
1 cup chorizo, diced
1/2 cup manchego cheese, grated
1/2 cup feta cheese, crumbled
1/4 cup coriander, chopped
1 tsp ground cumin
1 tsp ground coriander
Salt
I have specified that the potato should already be boiled and cooked, this is just to speed the process along. If you can't be bothered boiling a potato, I'm fairly sure I've seen pre-boiled tinned baby potatoes in most supermarkets (although I've never bought them!). Skins can be on or off, it's up to you.
If you can't get manchego cheese, just use cheddar.
I've listed both normal coriander AND ground coriander. Ground coriander is actually made from the dried seeds and has a completely different flavour to the fresh herb. If you want to leave out the fresh stuff then I'll understand, but please try to keep the ground coriander if you make this.
Method:
1. Place the chorizo into a cold pan, then turn on to medium high heat and fry until it releases its oil and begins to turn crispy. Transfer to a bowl and return the pan to the heat.
2. Add a splash of oil to the pan then add the potato and fry for 1-2 minutes or until the edges start to crumble.
3. Add the ground cumin and ground coriander along with a generous pinch of salt and continue to fry until the edges start to go crispy.
4. Transfer the potato to the bowl of chorizo and allow to cool.
5. Add the manchego, feta and chopped coriander to the bowl and mix until everything is evenly dispersed. The filling is now ready to use for both the empanadas and the alternative use.
Filling #2: Spicy Seafood
Once again, all in the name.
Alternative Use: Eat hot with some rice (kind of like a seafood chile con carne?).
Ingredients:
1 cup raw fish, diced
1 cup raw peeled prawns, diced
1 red onion, diced
2 cloves garlic, diced
1/2 cup chopped coriander
3 tbsp tomato paste
2 tbsp water
1/2 tbsp chilli powder
1/2 tbsp caster sugar
Salt
The type of fish doesn't really matter all that much. Use something you like if you have a preference.
Yes, yes, MORE coriander! As the season progresses you'll keep seeing it in my ingredients. I promise it's still my 2nd-most-hated herb, I just can't get away from it in this type of cuisine.
Method:
1. Add some oil to a pan over medium-high heat, add the onion along with a generous pinch of salt and fry until softened.
2. Add the garlic and continue to fry until it begins to brown.
3. Add the chilli powder and sugar and fry for 30-60 seconds. (The sugar will start to caramelise everything so keep an eye on it or it may burn.)
4. Add the tomato paste and water and stir to combine, then simmer until reduced slightly.
5. Add the fish and prawns and simmer until cooked.
6. Transfer to a bowl and mix through the coriander. Allow to cool completely if you're going to use it as a filling for your empanadas, otherwise eat it hot as per the alternative use.
Filling #3: Apple & Cinnamon
Pretty sure you'll be able to guess at least 2 of the ingredients in this!
While empanadas are traditionally savoury, I thought it was worthwhile experimenting with a sweet filling. Dust them with some icing sugar to add a little more sweetness.
Alternative Use: Add to the bottom of a lined cake tin, top with your favourite sponge cake batter, and bake as normal for an upside-down apple tea cake.
Ingredients:
2 1/2 cups apple, diced
3 tbsp brown sugar
1/2 tbsp of ground cinnamon
Zest and juice of 1 orange
Salt
For this amount of apple, it's basically 3 whole cored apples. I've never really paid attention to the type of apples I use in cooking. I know some are meant for baking, some for eating, etc. but I've never taken much notice. I think I used Pink Lady for this? And I left the skin on because, really, who can be bothered?
While this is a sweet filling, I've included salt. You won't need much of this, and it's really there to draw some of the moisture out of the apples so they soften faster.
Method:
1. Off the heat, add the orange zest and juice to a saucepan along with the sugar, cinnamon and a small pinch of salt. Stir together until combined.
2. Place the saucepan over a medium heat and cook until bubbling and reduced, stirring occasionally. (The ground cinnamon will thicken the mixture quite quickly, which is why I've recommended a lower heat than usual.)
3. Add the apple and mix until coated, then cook for approx. 5 minutes or until softened.
4. Transfer to a bowl and allow to cool completely before using in either the empanadas or the alternative use.
A video of all 3 recipes is available at https://youtu.be/evlkbk_1jBs.
5.02 Dips & Chips - Party Food - Intermediate
Okay, so moving on from tortillas into actual food territory, this week's recipe is actually 3 recipes (or rather 4, I suppose).
Today it's all about dips. While I completely understand that most people will buy premade dips and salsas, hopefully there's those random few (like me) who enjoy making their own.
It's worth noting that all of these dips can be used as fillings/sauces in tacos, burritos, quesadillas, or on nachos. No need to restrict yourself!
PART A - PICO DE GALLO
This is basically where pre-made salsas stemmed from. A bit of tomato, chilli, etc., basically all much of a muchness, right? Wrong!
While most pre-made salsas are suspiciously sweet or overpoweringly spicy, the traditional Pico de Gallo is a fresh, zingy concoction that's almost more of a salad than a dip or sauce.
Ingredients:
3 tomatoes, diced
1 red onion, diced
2 jalapeno chillies, diced
1/2 cup coriander, chopped
Juice of 1 lime
Salt
The above ingredients are just a suggestion. If you prefer to change quantities or leave out something entirely - I'm looking at you, coriander! - then by all means go right ahead.
Method:
1. Place the onion into a bowl along with the lime juice and a generous pinch of salt. Mix together and leave for 5-10 minutes so that the acidity mellows the heat of the onion slightly.
2. Add in all the other ingredients and mix until combined.
3. Serve. (Hardly even cooking, and only slightly more difficult than opening a jar.)
PART B - TOMATILLO SALSA VERDE
I really struggled to name this salsa because I didn't want to confuse anyone who may mix it up with a normal salsa verde, but it got a bit too abstract ("verdamole", anyone?) so I thought I'd play it safe.
Basically, where as the Pico de Gallo is noticeably bright red, I wanted something predominantly green to put alongside it. Hence, one or two of the ingredients are decidedly not traditional to this type of cuisine.
Ingredients:
1 cup tomatillos, diced
1 avocado, diced
2 spring onions, sliced
1/2 cup coriander, chopped
3 tbsp extra virgin olive oil
1/2 tbsp sugar
Juice of 1 lime
Salt
For those of you who are not familiar with them, tomatillos are kind of like green tomatoes. But don't confuse them with green tomatoes, because that's not actually what they are, despite the fact some people call them that. They're more closely related to gooseberries. Either way, they are quite tart and tangy and usually found in tins.
Your avocado should be ripe, but still slightly firm. It won't be easy dicing up a too-soft avocado without it getting a bit mashed, and crunchy avocadoes aren't very nice, so just make sure you get something in between.
Spring onions are milder (and greener) than the regular kind, which is why they work better in this recipe than, say, a regular white onion.
I know, I know... MORE coriander. I've mentioned before that I have a love/hate relationship with it, but when it comes to Mexican/Latin/whatever food it definitely has a place.
The sugar is there to balance out the acidity of the lime juice and tomatillos. You can leave it out if you want, but only if you're a bitter person (hehehe).
Method:
1. Place the sugar into a bowl along with the lime juice and a generous pinch of salt. Stir until the sugar dissolves.
2. Add the spring onions, stir and leave to mellow for 5-10 minutes.
3. Add in the remaining ingredients and mix until combined.
4. Serve! (Still easy... so far!)
PART C - CHEESY BEAN DIP
Unlike the previous dips/salsas, this one actually requires a bit of work, because it's a double-layered dip meant to be served hot. That's right, some actual cooking involved!
I will also point out that both layers are great dips on their own if you can't be bothered making both.
TO MAKE THE BEAN DIP:
Ingredients:
1 cup kidney beans
1 cup cannellini beans
1 red onion, diced
2 cloves garlic, chopped
1 tsp ground cumin
1 tsp ground coriander
Salt
I used kidney beans and cannellini beans because they are the most widely available here in Australia. If you can get hold of pinto and/or black beans, they might be more traditional.
Method:
1. Heat some oil in a pan over medium-high heat. Add the onion along with a generous pinch of salt and fry until it begins to brown.
2. Add the garlic and fry until softened (approx. 1-2 mins).
3. Add the cumin and coriander and fry for 30-60 seconds.
4. Add the beans and continue to fry for 5 minutes or so until they begin to soften and break down.
5. Transfer the mixture to a food processor and blend until smooth.
6. Spoon into serving bowls. (TIP: Leave at least 1/3 empty for the top layer.)
TO MAKE THE CHEESY JALAPENO TOPPING:
Ingredients:
200g manchego cheese, grated
200g fetta cheese, crumbled
150ml tequila
1/3 cup plain white flour
3 tbsp unsalted butter
Pickled jalapeno chillies, chopped (approx. 1/4 cup)
I find that a mix of melty and creamy cheeses get a good result, which is why I settled on manchego and fetta. By all means, choose your own combination.
I approached this the same way as I'd approach a fondue, then swapped out white wine for tequila. Because why not?
In relation to the jalapenos, I used half green and half red for aesthetic appeal.
Method:
1. Melt the butter in a pot over medium heat.
2. Add the flour and stir until absorbed and the mixture turns a light nut-brown colour.
3. Reduce the heat to low and add in the tequila, mixing to form a paste. (Be careful here as your pan may catch fire and, for once, that's NOT what I want!)
4. Add the manchego and stir until it begins to melt, then add the fetta.
5. Mix until everything melts together.
6. Turn off the heat and mix in the jalapenos.
7. Spoon over the top of the bean dip. (TIP: You'll want to serve this hot to prevent the cheese from solidifying too much. Not like BLISTERINGLY HOT, just hot enough to keep the cheese molten enough to scoop.)
Serve with corn chips. (Either make your own or just buy them.)
A video of all 3 recipes is available at https://youtu.be/xm6TAFxWVB8.